NOTE: Inventory Item Attributes are for Saasu files large and above.
Item attributes enable you to track detailed information about products, commodities, services, or virtual items that you trade in your Saasu file. For example, you may want to apply an expiry date to an item, specify it’s colour or size, and which stores have it on hand.
Examples of item attributes and how they relate to different business models:
- Food Wholesaler – Location, Batch, Expiry
- Surfboard Shop – Length, Colour, Shape
- Clothes Shop – Size, Colour, Batch number
- Electronics e-tailer – Serial Number, Colour, Memory Size, Connectivity Type, Warranty
- Heath Food Shop – Serial Number, Expiry, Batch Number
- Music/Software – Product Key, ISIN, Expiry/Renewal
- Book seller – Author, Publisher, Format, Genre or Category
Important Notes:
- Attributes are available on individual inventory items and not on combo items.
- They cannot be imported or exported by CSV or spreadsheets.
- Attributes cannot be entered for Inventory Adjustments, Inventory Transfers and Inventory Item Opening Balances.
- Ensure that attributes are recorded on all Purchases and Sales. Attributes which are not entered on Purchases and Sales will cause discrepancies between the item Stock on Hand and the Attribute Stock on Hand.
Setting Up Attribute Categories
In Saasu we provide for some built-in item attributes that are commonly required such as serial numbers, batch numbers, and location. We can also add other item attributes that meet your business needs.
Your Large file will have three standard attributes provisioned to it. These are Location, Batch # and Serial #. If you want to add an additional two attributes to your Saasu file or want to edit the existing three attributes please raise a service ticket and we will add them.
Note: The maximum character length for an individual attribute is 32 characters.
Set Stock Levels, and Locations using Attributes
To set Attributes to stock, please create a purchase invoice as follows:
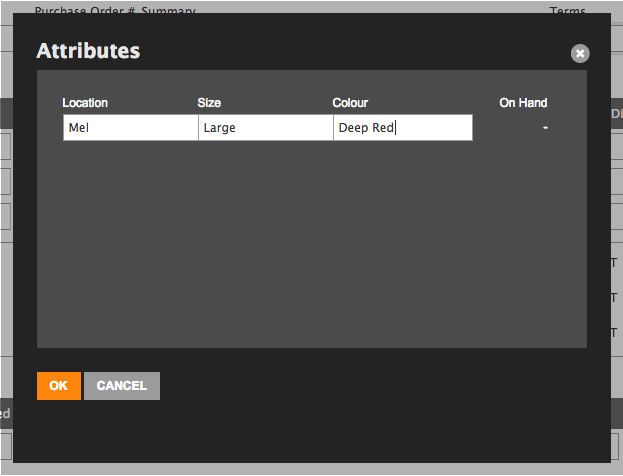
In this example, there are 15 units of the item called “Leather Belt”. The break-down by attributes for this scenario: All are in Melbourne, 5 Large in “Deep Red”, 5 Med in “Deep Red” and 5 Small in “Deep Red. To access Attributes, create 3 separate lines of 5 units each, and click on the ‘Label’ icon:

Note here that each variation must have its own line entry on the invoice. The ‘On Hand’ quantity is the quantity you enter at the invoice, on each line level.
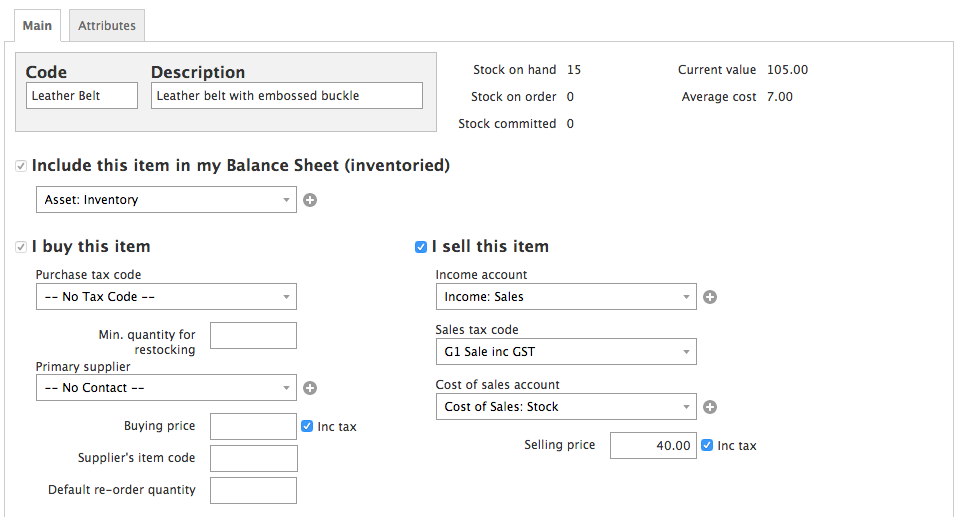
After the purchase invoice to record the stock with attributes has been entered, note the total stock on hand matches the quantity on the purchase invoice:
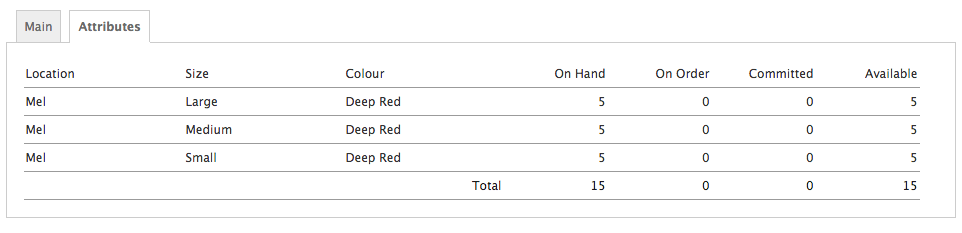
Check the ‘Attributes’ tab to see the breakdown:
View the Attributes for an Item
- Select View > Items.
- Open the item using the pencil icon.
- Click the Attribute tab.
Create Attributes for Items
- Please note that this step applies to new items that you have yet to purchase in (receive in). If you have existing items, you cannot apply attributes to them, refer to Transfer Stock Items below.
- Create a purchase order for the stock you want to apply attributes to
- Next to the item description field, click on the attribute ‘tag’ icon to load the Attributes window.

- Fill in the details for this item.
- Repeat this step for all individual items requiring attributes assignment.
- Click Save when done.
Selling Items with Attributes
When creating Sales for items that have Attributes, please ensure that the ‘Label’ icon to access Attributes is used. This is to ensure that items sold will reduce the corresponding Attributes. This is necessary to also ensure the Attributes On Hand matches the Stock On Hand of the item.
Transfer Stock Items
Inventory Transfers and Adjustments do not affect attributes at the moment. Please process using a purchase & sale. See exact steps below:
- Create a contact and set the First Name field to Transfer – You can use this contact for all internal transfer transactions.
- Add a purchase for the stock you are transferring.
- In the items list area of the purchase, use the attribute icon to load the Attributes window.
- In the Location column, enter the name of the new location you are moving the stock to.
- Set the unit price to be the same as your current average cost for that item if you don’t want to realise value in your profit and loss
- Enter payment details to be a clearing type bank account (eg Asset: Stock Transfers Clearing – Create one if you don’t have one already).
- Choose Save.
- Select Duplicate.
- Choose the internal contact called Transfer again.
- Set the Quantity to be a negative amount of stock. This has the effect of reducing the stock in the location you set in the next step.
- Go into the attributes window and select the location you are moving the stock from (the available locations where you hold stock).
- Set the unit price to be the same as your current average cost for that item.
- Enter payment details to be a clearing type bank account (eg Asset: Stock Transfers Clearing – Create one if you don’t have one already).
- Save and close the transaction.
Payments are netted in the clearing account so there is no financial impact.
TIP: If you don’t want transfers to appear in the Purchases report, leave the contact blank in these transactions.
Attribute Reporting
There are two Attribute reports:
- Item Attribute History – a history of all transactions made within a date range, for each attribute category, sorted by the invoice date
- Item Attribute Summary – similar to the Stock Value report, it gives the on hand, on order, committed and available figures as at the date you run the report
You can also view Attribute information through View > Items > Items, and then click on the ‘Attributes’ tab:
