If your Saasu file was created after the 29 Jan 2019, please refer to the new Themes Library feature. This old feature will be available until 1st December 2022 (delayed due to STP Phase 2). Try the new Theme Library feature by changing your settings. Note that this new feature hasn’t yet got all the planned functionality.
Saasu lets you customise the PDF version of your invoices, purchases, statements and payslips so you can include your logo, company branding, additional information (like payment information or terms) and changing the layout. You can also customise the details included when you email the PDF.
The content is dictated by the PDF Template and Merge Fields and the design is dictated by the HTML Theme.
Template sections
Sender Details – The text you enter into this section will appear in the top right corner of the invoice opposite the logo. Again, you can enter any information you want into this area, but it is best suited for your business address, phone number, website and email contact information. If you add more than 10 lines of information it will start to push the address and invoice content down the page.
Remittance Details – The text you enter into this section will appear immediately below the list of items in your invoice. Although most suited to remittance information, you could include any information that you like in this area. Remittance information is the information your customers require to make a payment. This may be payment information, PayPal, Ebay, Bank Direct deposit, Credit Card payment options.
Payment Options – List the payment methods you accept and the details for these methods
Footer Text – This is the information that appears in the footer area of each page. You may choose to include your address details or any other relevant information that you feel would be useful in this location. Examples include business registration numbers, terms of trade, general Disclaimers or Privacy Statements, Product Disclosure Statement link and Terms and Conditions.
PDF Specifications
- Page Size: A4 210 x 297 (8.27 x 11.69)
- Margin Top (mm): 10mm (0.394) = 28pt
- Margin Right (mm): 10mm (0.394) = 28pt
- Margin Bottom (mm): 5mm (0.197) = 14pt
- Margin Left (mm): 26mm (1.024) = 56pt
- * Points = 1/72nd of 1 Inch
- # DPI = Pixels / Inches
Logo
To add your logo:
- Go to View > Templates > open you template you wish to add a logo to by clicking on it.
- Use the Upload link next to your logo drop down box to browse and upload your logo from your computer.
- Click Preview to see how it looks. Saasu will load a sample PDF in Adobe Reader or in a Tab in your browser.
- If you’re happy with the result click Save in the templates add/edit screen to save your changes otherwise upload another image and try again.
Change the logo:
- Go to View > Templates to open the template
- Upload new logo or use one that you’ve uploaded before.
- Click the Save option at the bottom of the screen.
Tips and Information about logos
Resize your logo using online image resizer tool.
You can upload multiple images to use as logos (JPG, GIF and PNG). The maximum file size is 100KB.
File Width maximum is 960px if you aren’t putting information in the Sender Details area. Else it is 640px. Saasu doesn’t auto-size images.
The quality of the image you upload will directly result in higher quality PDF’s in Saasu but your PDF file size you are sending out will also be larger. So there is a trade off between quality and file size. Generally the market likes to receive PDF files for invoices around 100kb.
For the best quality result we recommend using images with a resolution of at least 150dpi. Bear in mind higher resolution images will result in PDF generation taking longer each time.
You might sometimes need to try different formats from the above list for your templates. So in case if one format is not displaying properly or if you have trouble viewing the PDF invoice, you could try converting the image into another one from above. This usually resolves any rendering issues that were preventing you from viewing the PDF invoice. It is important that the image stays within the recommended size for viewing with or without sender details.
Adding Payment Details
WHERE: View > Templates
In the PDF template you can set defaults for various areas that make up your invoices and statements, upload and select a logo for the template, add notes and provide information such as payment details.
You can have different PDF templates for different trading names, individualised for particular customers or even customised for different times of the year (eg. Christmas or End of Financial year). There is no limit to the number of templates you can have.
Electronic Funds Transfer (Direct Deposit)
Also know as EFT. This is where you want your customer to pay you direct to your bank account. They might do this by transferring money to you in online banking (pay others) or by depositing a cheque or cash into your account at your bank.
- Goto the section “Payment, notes and other information”.
- Enter your bank details for EFT such as Account Name, BSB and Account number
- Save the screen
BPay
BPAY is a payment process used in Australia. Businesses wanting to be able to receive BPAY payments will need to contact your financial institution to apply. As part of the sign up process, you will be provided with a BPAY Biller Code and the BPAY Operations Manual. You can then provide these in your Saasu Invoices so your customers can pay you. Below we provide some ways to help you do this.
How you provide a reference number to your customers is quite important as it may impact reconciliations and other workflow. Generally speaking unique numbers of each payment help you assign the payment to the correct transaction but require your customer to enter a new unique reference number each time they pay you. Alternately a static number is easy for your customers and reduces their input/entry risk but it may add to your reconciliation burden. Saasu can only support static CRN’s as we don’t yet support CRN generation. You can create a static CRN for each customer using BPays CRN tools.
You can create a BPay reference number as follows:
Use the BPay software to work out your clients CRN number. A single digit number. Let’s say 7
Go to View > Templates. Open your template by clicking on it and navigate to the Payment area.
Add this text (note that the template can be set to Text or HTML):
BillerCode: [supplied by your bank]<br>
Cust Ref#: {BillingContact.ContactID}{InvoiceNumber}7
Creating a tear-off
A tear-off is often used when people make payments by cheque or credit card and you would like them to send this information back to you so you can match the received cheque against their invoice or process the credit card payment using the handwritten information. To create a tear-off:
- Go to View > Templates
- From the list, click the name of the Template with the Type “Sale Default”
- Copy the below Remittance Advice text into the “Payment, notes and other information” field in the Template screen. NOTE: Make sure you have it at the bottom of this section if you are having other information such as bank details in this section also.
- Edit the “Your Company” section to be your company name and address.
- Leave the merge fields below as displayed. Saasu injects data into these as we create the invoice that is from the transaction itself.
- Save the screen
——- Remittance Advice – Please retain the above portion for your records ——-
Your Company
Address Line 1
City State Postcode
Customer Ref: {BillingContact.ContactID}
Customer: {BillingContact.FirstName} {BillingContact.LastName}, {BillingContact.Company.Name}
Invoice#: {InvoiceNumber}
Amount Due: {HasAmountOwed}
Email Template
Where: View > Templates > Email tab
Saasu emails invoices, purchases and statements directly to customers and suppliers from within Saasu, without additional email software or plug-ins. The email template handles the information that is included in the body of the email, whereas the PDF template handles the information contained with invoice, purchase or statement that is attached to the email.
In the email template you can use merge fields to include customer information such as name, company or other information contained within the contact data.
BCC your emails to a mailbox you own
Setup a mailbox for your business that can act as a repository containing a copy of all the email you send out. e.g. [email protected]
Don’t use Email templates for
- Marketing by sending quotes/invoices soliciting business that has not already had a customer opt-in to buy a product or service from you.
- Any other use other than the intent to deliver an invoice to a contact for the purposes of finalising a pre-agreed transaction.
Does Saasu keep a copy for me?
You can always print/view a copy of an invoice or statement from within Saasu but we don’t provide email storage at this stage. We suggest you BCC everything you send out to your contacts.
Do merge fields work in Email templates?
Yes. You can use merge fields such as {BillingContact.FirstName} to personalise your emails. Please see Merge Fields for details.
Can I use a different template when emailing a contact
At present this is only available in Automated Transactions to allow different templates to be used for different groups of contacts you send to. In a later release we will allow you to choose an email template when you go to send a manually created transaction but at present this only uses the Default template.
Templates for different invoice types
Saasu already supports many invoice types including tax invoices, orders, quotes etc. as standard. If you require a specific invoice type that’s not available in the invoice type drop down, you can always create a new invoice template to associate with the invoice.
- Go to View > Templates from the main menu. Click on any template in the list.
- When you are in the Edit Template screen, click on the link “Edit and create your own theme” which can be found under the Theme pick list.
- From the Themes list, click on an inbuilt theme for either Sale or Purchase, depending on which transaction type you want to use the invoice template for.
- When you are in the edit Theme screen, scroll down to where the buttons are and click on the Duplicate button.
- Enter a name for the Theme. For this example, let’s call it “Proforma Invoice”.
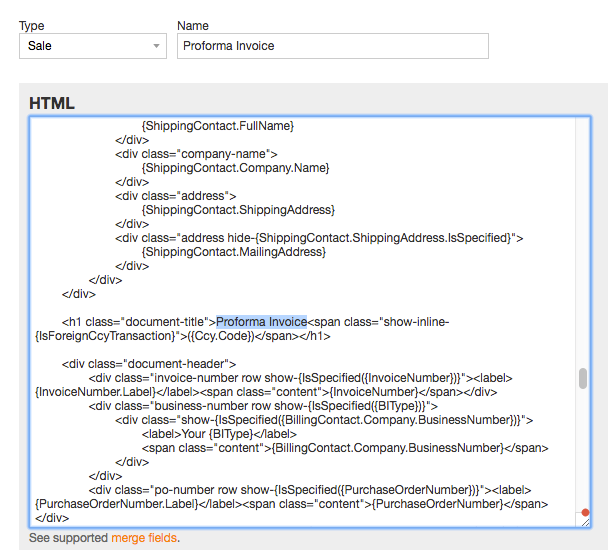
- Click inside the HTML markup text area, and scroll down to the document title section which has the merge field {InvoiceType.PrintDescription}. Replace this with the title you want. In our example we will simply add “Proforma Invoice” as shown below.
- Click on Save and Close.
- Go to View > Templates from the main menu again. Click on Add link on top of the list.
- Enter a name for the template, in our case we will be calling it “Proforma Invoice”.
- Select the previously created “Proforma Invoice” Theme from the theme pick list to associate it with this template.
- Click on Save and Close.
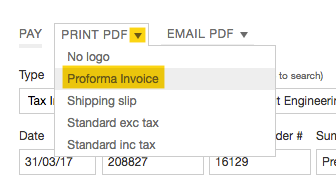
- When you want to email or print an invoice using this template next time, it will appear in the PDF and Email template lists in both invoice list and invoice edit screens as shown below.
HTML Themes for your templates
Themes for files started prior to 29th January 2019
To use Saasu OLD Themes you are required to have HTML and CSS coding experience. NOTE: OLD Themes will no longer be supported from 1st July 2022 as a new template builder will be available in Saasu
Themes allow a high degree of customisation of the design and layout, and form the base for the PDF template used in invoices, purchase orders, receipts, payslips, and statements. As themes are created using HTML and CSS you will need to be comfortable with using this code in order to get the best result. Alternatively you can use your web designer to assist in creating themes that match your brand.
WHERE: View > Templates > Edit and Create your own theme (link below Theme picklist)
Themes in Saasu allow you to add useful design features to one or more of your templates. Themes are designed to give Saasu customers with HTML and CSS programming skills the flexibility to help their business customers with specific PDF and email documentation needs in Saasu. Their requirements may include:
- Design elements such as colours, fonts, and images.
- Information blocks such as warranty or product information.
- Logistics information such as barcodes, delivery maps, and other devices.
- Translation to other languages.
Themes do not provide a way for customers with no programming experience to change the look and feel of their templates. If you haven’t used HTML and CSS programming code before, it’s probably best not to attempt this as we don’t provide HTML/CSS programming support. This is due to the intensity of having to teach people programming before we can even suggest how to work with using the Themes feature in Saasu. Don’t worry though, as we are happy to recommend a third party who can assist you with template customisation for our customers who don’t have these skills or access to them.
Themes let you to control far more design elements in a document, including where your logo displays, and the colour and type of font you use. You can even embed things like maps, images, links, and buttons.
To edit your Theme:
- Select View > Templates > Choose a template you want to design or edit a theme for – The Template will load in edit mode.
- Click Edit and create your own theme.
- Saasu will display some default themes that we have set up. You can open one similar to what you need and duplicate it using the Duplicate button.
- Edit the CSS and HTML code for the theme.
- You can use the Preview button to check your progress. The preview will display as a PDF so you can be sure the design work you are doing matches what your customers will see.
NOTE: When you edit a Sale or Purchase theme, two formats will display when you preview your changes – An Item style view and a Service style view.
Theme versions
You may need different versions of a theme for different situations. You may need to customise words, like the invoice title for example. To do this duplicate the theme you want to change, make the changes, and set up the template to use the theme that you change. Some HTML knowledge is required to do this. Otherwise, it could be frustrating to get it working. Here are the steps:
- Open the template you want to edit.
- Click Edit and create your own theme below the Theme picklist.
- Pick the theme you want to edit.
- Duplicate the theme.
- Make your changes. For example, if you just want to change the title, find the text {InvoiceType.PrintDescription} and replace it with the word that you want to use.
- Click Preview to see your changes.
- Click Save once you’re happy with these.
- Go back to the template list screen and open the template you want to change.
- Change the theme to the new one you just created and click Save.